Postingan

Menampilkan postingan dengan label Linux

Install Packet Tracer 7.3.0 on Ubuntu 19.10

1. Download Packet Tracer 7.3.0 from Netacad website. https://www.netacad.com/portal/resources/packet-tracer 2. Install Dependency wget http://mirrors.kernel.org/ubuntu/pool/main/d/double-conversion/libdouble-conversion1_2.0.1-4ubuntu1_amd64.deb sudo apt install ./libdouble-conversion1_2.0.1-4ubuntu1_amd64.deb wget http://mirrors.kernel.org/ubuntu/pool/main/q/qt-at-spi/qt-at-spi_0.4.0-3_amd64.deb sudo apt install ./qt-at-spi_0.4.0-3_amd64.deb sudo apt --fix-broken install 3. Install Packet Tracer  dpkg -i PacketTracer_730_amd64.deb Done.

How to configure PAM to allow/deny users login

Filter User Login Linux Menggunakan PAM (Whitelist User) Pada contoh ini akan dijelaskan cara membatasi user yang boleh login ke sistem Linux (GUI maupun console) menggunakan konfigurasi PAM (Pluggable Authentication Module) . Metode ini cocok digunakan jika hanya ingin mengizinkan user tertentu saja untuk mengakses sistem. ⚠️ Peringatan Sebelum Konfigurasi Sebelum melakukan perubahan: Sebaiknya lakukan di server percobaan Buat snapshot / backup Kesalahan konfigurasi PAM dapat menyebabkan gagal login ke sistem 1️⃣ Edit File PAM Authentication Buka file berikut: nano /etc/pam.d/common-auth Tambahkan baris berikut di bagian paling bawah : auth required pam_listfile.so item=user sense=allow file=/etc/pam.d/users.allow onerr=fail Lalu simpan perubahan. 2️⃣ Buat File Daftar User yang Diizinkan Buat file whitelist user: nano /etc/pam.d/users.allow Isi dengan username yang boleh login, satu user per baris: root user1 user2 user3 3️⃣ Pengujian Konfigurasi Buat user ...

GNU/Linux networking

Selain menggunakan Cisco,Mikrotik,Juniper untuk keperluan networking, kita juga bisa langsung melakukan konfigurasi menggunakan GNU/Linux. Misalnya menggunakan distro Debian dan beberapa pilihan packages untuk keperluan-keperluan berikut: Routing -Quagga Quagga adalah sebuah network routing yang bisa mengimplementasikan Open Shortest Path First (OSPF), Routing Information Protocol (RIP), Border Gateway Protocol (BGP) dan IS-IS untuk Unix-like platforms, particularly Linux, Solaris, FreeBSD dan NetBSD https://www.nongnu.org/quagga/ Tunnel GRE(Kernel module ip_gre) https://en.wikipedia.org/wiki/Iproute2 https://manpages.debian.org/stretch/iproute2/ip-tunnel.8.en.html VPN SSL VPN(openvpn)   https://openvpn.net / IPSec VPN(strongswan)  https://www.strongswan.org/ IPSec VPN(racoon ipsec-tools)  https://wiki.debian.org/IPsec https://wiki.gentoo.org/wiki/IPsec_L2TP_VPN_server PPPoE https://wiki.debian.org/PPPoE 802.1Q ...

Cara Cek Konfigurasi Software Linux Server

Konfigurasi akan hafal sendirinya ketika sering berlatih, lebih tepatnya familiar. Untuk di linux sendiri terdapat manual page, /usr/share doc yang bisa dimanfaatkan untuk melihat konfigurasi ketika lupa dan ketika melakukan konfigurasi terkadang terdapat misconfiguration, entah itu kurang tanda baca atau ada script yang tidak tepat, berikut cara-cara untuk melakukan cek konfigurasi yang dilakukan. Silakan dicoba-coba perintah-perintah dibawah ini, biasanya saat service restart sofware_name   terdapat info failed, nah perlu dicek konfigurasi dimana letak kesalahannya,  ada beberapa cara seperti melihat log di /var/log/... dan cek dengan perintah Webserver apache #apachectl configtest Webserver nginx #nginx -t DNS Bind9 #named-checkconf  ... FREERADIUS #freeradius -CX LOAD BALANCER HAPROXY #service haproxy configtest MAIL POSTFIX #postconf -d FILE SERVER SAMBA #testparm VPN OPENVPN openvpn --config /path/to/server.conf ...

Menggunakan perintah Find untuk mencari file di Linux

Berikut adalah perintah nya: root@nas-srv1:~# find / -name 'Laporan*' Perintah diatas mencari file dengan nama Laporan*, tanda asterisk * artinya semua nama akhiran dari nama Laporan. Bisa juga ditaruh diawal.  '*Laporan*' artinya semua nama file yang dicari yang mengandung kata 'Laporan'. Untuk fitur lebih lanjut #man find  Bisa juga mencari file dengan perintah locate https://nciptandani.blogspot.com/20loc16/02/menggunakan-perintah-ate-untuk.html

Installing PowerShell Core on Linux

Gambar
Download the Debian package powershell_6.0.3-1.debian.9_amd64.deb from the releases page onto the Debian machine. https://github.com/PowerShell/PowerShell/releases/tag/v6.0.3 An then execute the following in the terminal: wget https://github.com/PowerShell/PowerShell/releases/download/v6.0.3/powershell_6.0.3-1.debian.9_amd64.deb dpkg -i powershell_6.0.3-1.debian.9_amd64.deb apt-get install -f Run PowerShell

Tips iptables menghapus rule di line tertentu

Dengan ini tidak perlu menghapus semua rule yang sudah dibuat, cukup lihat baris keberapa dan hapus. Cara memeriksa ada rule iptables dengan option --line-numbers gunakan perintah berikut: iptables -L -n --line-numbers   iptables -t nat -L -n --line-numbers Jika perlu menghapus salah satu rule iptables, perlu mengetahui 2 hal. Nama chain ditetapkan, dan nomor baris nya. Selanjutnya tinggal dilihat nomor rule yang ingin dihapus. Untuk menghapus jalankan perintah ini iptables -D INPUT 1 Contoh diatas akan menghapus rule 1 dari chain INPUT.

Simple Load Balancer using IPTables

Konfigurasi Linux agar berfungsi sebagai router. sysctl -w net.ipv4.ip_foraward = 1 Mengkonfigurasi IPTables iptables -t nat -A PREROUTING -p tcp -i eth1 --dport 80 -m state --state NEW -m statistic --mode nth --every 2 --packet 0 -j DNAT --to-destination 192.168.2.2:80 iptables -t nat -A PREROUTING -p tcp -i eth1 --dport 80 -m state --state NEW -m statistic --mode nth --every 2 --packet 1 -j DNAT --to-destination 192.168.2.3:80 Jangan lupa konfigurasi di chain FORWARD jika default chain FORWARD nya drop. Referensi: https://www.netfilter.org/documentation/HOWTO/netfilter-extensions-HOWTO-3.html 

Basic Crontab

Crontab is used to run a command or script that has been scheduled at a certain time. Crontab can be used to run tasks that require periodic intervals, examples of time synchronization or backups, so the admin does not have to do it manually. Every user on linux has their own crontab file. See the ongoing crontab To see the running crontab using the command # crontab -l Edit Cronjobs To edit the cronjobs list use the command # crontab -e Then it will open the editor, in Debian 9 that I use, the default editor use nano. Crontab writing format * * * * * command to be executed The meaning of its asterisks # + ---------------- minute (0 - 59) # | + -------------- hour (0 - 23) # | | + ------------ day of month (1 - 31) # | | | + ---------- month (1 - 12) # | | | | + -------- day of week (0 - 6) (Sunday = 0 or 7) # | | | | |   * * * * * command to be executed Usage examples for time synchronization with the ntpdate command Execution every minute: * * * ...

Konfigurasi OpenVPN Server dan Client

Berikut adalah dokumentasi konfigurasi openvpn Install Openvpn Pembuatan sertifikat edit konfigurasi server.conf untuk vpn server edit konfigurasi client.conf untuk vpn client Konfigurasi routing NAT trafik 1  KONFIGURASI OPENVPN  Install OpenVPN  apt-get install openvpn    Membuat Sertifikat dan Key  Copy file-file untuk membuat sertifikat dan key dari  /usr/share/doc/openvpn/examples/easyrsa/2.0 ke /etc/openvpn  cp –R /usr/share/doc/openvpn/examples/easy-rsa/2.0 /etc/openvpn/  Pindah ke /etc/openvpn/2.0 di sini akan mulai membuat sertifikat dan key  cd /etc/openvpn/2.0    Ubah beberapa script di /etc/openvpn/2.0/vars yang nantinya akan digunakan dalam mengisi  informasi sertifikat dan key  pico /etc/openvpn/2.0/vars  Cari script di bagian bawah  export KEY_COUNTRY="ID" export KEY_PROVINCE="Jakarta"  export KEY_CITY="Jakarta" export KEY_ORG="TKJ" export  KEY_EMAIL="andi@gmail.com"...

Cara Konfigurasi Email Forwarding di Postfix Linux Menggunakan /etc/aliases

Forward Email (Email Forwarding) Forwarding email dapat dikonfigurasi melalui file aliases yang berada di: /etc/aliases Agar Postfix menggunakan file tersebut, jalankan perintah berikut: postconf -e "alias_maps = hash:/etc/aliases" Mengisi File Aliases Edit file /etc/aliases , lalu tambahkan konfigurasi sesuai kebutuhan. Contoh Konfigurasi Meneruskan semua email untuk user root ke user lokal nasohi : root: nasohi Meneruskan email dari user lokal nasohi ke email eksternal: nasohi: myemail@example.com Meneruskan email ke lebih dari satu tujuan (lokal dan eksternal): nasohi: nasohi myemail@example.com Menerapkan Konfigurasi Setelah mengedit file aliases, jalankan perintah berikut agar konfigurasi masuk ke database aliases: newaliases Kemudian reload service Postfix: /etc/init.d/postfix reload Referensi https://wiki.debian.org/Postfix

Enable GUI for root

1. Open "/etc/pam.d/gdm3" with vi, pico, nano, etc.         #pico /etc/pam.d/gdm3 2.  Search "auth     required     pam_succeed_if.so  user  != root   quiet_success"  , comment it out like below:     #auth     required     pam_succeed_if.so  user  != root   quiet_success

Cara mount samba share dengan perintah mount

Berikut adalah perintahnya: #mkdir /mnt/lnxsrv1-data1 sebagai tempat untuk mount server lnxsrv1 dengan ip 10.12.13.100  #mount -t cifs -o username=nasohi,workgroup=workgroup,password=Skills39 //10.12.13.100/data1 /mnt/lnxsrv1-data1/ Untuk melihat hasilnya mount dengan perintah: #mount maka muncul dibawah ini: //10.12.13.100/data1 on /mnt/lnxsrv1-data1 type cifs (rw,relatime,vers=1.0,cache=strict,username=nasohi,domain=workgroup,uid=0,noforceuid,gid=0,noforcegid,addr=10.12.13.100,unix,posixpaths,serverino,mapposix,acl,rsize=1048576,wsize=65536,actimeo=1) atau cek saja di folder /mnt/lnxsrv1-data1  apakah sudah ada file dari server 10.12.13.100/data1

Mengganti konfigurasi NAT router linux debian dengan router cisco 1841

Gambar
Mengganti Router Linux Debian dengan Cisco 1841 dan Konfigurasi NAT Pada kasus ini, tujuan utamanya adalah mengganti router Linux Debian dengan Cisco 1841 untuk menghubungkan jaringan kantor dengan jaringan ISP (Internet Service Provider). 1. Pengantar Jaringan dan Router Router adalah perangkat jaringan yang digunakan untuk menghubungkan beberapa jaringan berbeda . Jaringan sendiri adalah kumpulan komputer dan perangkat yang saling terhubung. Mengapa ada jaringan yang berbeda-beda? Itu karena aturan pengalamatan dan segmentasi jaringan. Contohnya: LAN (Local Area Network) → jaringan lokal kantor MAN (Metropolitan Area Network) → jaringan area kota WAN (Wide Area Network) → jaringan area luas, termasuk internet Internet & Intranet Selain itu ada juga pengelompokan IP: IP publik vs IP privat , kelas IP, IPv4, IPv6, dan sebagainya. Di kasus ini: LAN kantor → jaringan lokal internal ISP → jaringan yang menyediakan akses ke internet, misalnya di Indonesia ter...

Main ICMP dengan IPTables

Gambar
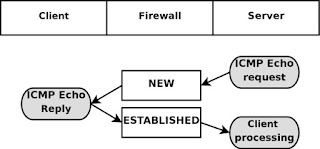
Jika ingin  hostA bisa ping sukses ke hostB, tetapi hostB tidak bisa ping ke hostA, maka perintah iptablesnya adalah cukup konfig di hostA hostA#iptables -A OUTPUT -o eth0 -p icmp --icmp-type echo-replay -j DROP echo-replay ini adalah salah satu type icmp yang berfungsi untuk membalas paket icmp dari yang ngePING, jadi misal hostB mencoba ping ke hostA, dihostA ada rule iptables seperti diatas, maka tidak terjawab. Dibawah ini adalah kasus lain yaitu diantara misal hostA(server) dan hostB(client) ditengah-tengah ada hostC(firewall) Ceritanya diatas Server melakukan ping ke Client, Server mengirimkan paket ICMP Echo request, terus melewati Router, di Router connection statenya NEW karena memang paketnya statusnya Baru dari Server, diterima oleh Client, Client merespons dengan mengirimkan paket ICMP Echo Replay dan seterusnya. http://www.cyberciti.biz/tips/linux-iptables-9-allow-icmp-ping.html http://www.iptables.info/en/connection-state.html ...

My brief presentation about Linux

Good Afternoon, Everyone My Name is Nasohi Ciptandani I am from Binus University Thank you for coming to my presentation Today I am going to talk about Linux operating system The reason I choose this topic because Linux is different from other operating systems, it is free and opensource. My talk is in two parts. First of all, I am going to talk about The history of Linux. After that, I am going to talk about the advantages using Linux. Firstly, The name "Linux" comes from the name of the creator, which was introduced in 1991 by Linus Torvalds. The system programs come from the GNU operating system, which was announced in 1983 by Richard Stallman. The GNU contribution is the basis of the rise of alternative name GNU / Linux. Linux has various  kinds of operating system is called distributions/distros such as Debian, ubuntu, kali Linux, RedHat, Fedora, SuSE, and you  can see more at distrowatch.com. In Indonesia also has Linux distros such as Blankon, TeaLinux, ...

Install Linux micro core / tiny core di GNS3

Saya mencobanya dengan gns3 1.3.3, hal yang perlu dilakukan adalah setting preferences di tab edit bisa dengan cepat ctrl + shift + p terus masuk ke qemu vms -> next - name -dst.  Yang perlu diperhatikan adalah pada saat di tab Advanced settings -> Additional settings -> Options ganti -nographic dengan -no-acpi Selengkapnya bisa ke Untuk gns3 dan image seperti vmware, vbox, qemu appliances bisa di downlaod di  http://sourceforge.net/projects/gns-3/files/ Untuk langkah-langkah memasang image tiny core dan setting ip, routing,dll dan menyimpannya bisa ke situs ini  http://www.brainbump.net/gns3-add-qemu-host-microcore/ dan http://commonerrors.blogspot.co.id/2011/05/please-configure-qemu-host-ns3-error.html

How to fix error “Could not reliably determine the server’s fully qualified domain name using 127.0.1.1 for ServerName" on apache2

To fix this problem  you need to edit the /etc/apache2/apache2.conf 1. Open the /etc/apache2/apache2.conf file with your text editor.     #pico /etc/apache2/apache2.conf 2. Add the following line:     ServerName localhost 3. Restart apache2 server:     #service apache2 restart     Restarting web server: apache2 … waiting .. Now your problem is gone. Enjoy.

Repository Debian

From Kambing Debian 7 deb http://kambing.ui.ac.id/debian/ wheezy main contrib non-free deb http://kambing.ui.ac.id/debian/ wheezy-updates main contrib non-free deb http://kambing.ui.ac.id/debian-security/ wheezy/updates main contrib non-free Debian 8 (Jessie) deb http://kambing.ui.ac.id/debian/ jessie main contrib non-free deb http://kambing.ui.ac.id/debian/ jessie-updates main contrib non-free deb http://kambing.ui.ac.id/debian-security/ jessie/updates main contrib non-free Debian 9 (Stretch) deb http://kambing.ui.ac.id/debian/ stretch main contrib non-free deb http://kambing.ui.ac.id/debian/ stretch-updates main contrib non-free deb http://kambing.ui.ac.id/debian-security/ stretch/updates main contrib non-free From UGM deb http://repo.ugm.ac.id/debian/ stretch main contrib non-free deb http://repo.ugm.ac.id/debian/ stretch-updates main contrib non-free deb http://repo.ugm.ac.id/debian-security/ stretch/updates main contrib non-free

Cara menggunakan editor VI

Essential Vi Commands Open a file: #vi filename To go into edit mode: #press ESC and type I To go into command mode: #press ESC To save a file : #press ESC and type :w fileName To save a file and quit : #press ESC and type :w