Postingan

Menampilkan postingan dari September, 2018

Materi ITNSA

Buatlah outline dari materi ITNSA untuk mengetahui sejauh mana kemampuan-kemampuan yang sudah dikuasi, dengan mengusai outline materi ITNSA maka jika ada perubahan bahasa pada test project, perubahan IP, lokasi server, user, password, domain, penamaan, dll masih tetap bisa memahami, dan mengerjakan dengan baik. Misalnya Modul A DNS Forward DNS Reverse DDNS Webserver Virtualhost Webserver HTTPS Webserver authentication SMTP SMTPS IMAP IMAPS LDAP Users LDAP OU LDAP Group ... ... ... Modul B Active Directory Users Active Directory OU Active Directory Group Active Directory Import Users from Excel file GPO First Sign Animation GPO Password Policy File sharing home folder File sharing group policy ... ... ... Modul C OSPF Multi Area OSPF Autentication OSPF IPv6 IOS ACL ASA ACL ... ... ...
How to check MySQL Database size in Linux

SELECT table_schema "DB Name",         ROUND(SUM(data_length + index_length) / 1024 / 1024, 1) "DB Size in MB"  FROM information_schema.tables  GROUP BY table_schema; or #du -h /var/lib/mysql

OpenSSL certificate checking

Check a certificate Information about it (signing authority, expiration date, etc.):    openssl x509 -in server.crt -text -noout Check a key Check the SSL key and verify the consistency:    openssl rsa -in server.key -check Check a CSR Verify the CSR and print CSR data filled in when generating the CSR:    openssl req -text -noout -verify -in server.csr Verify a certificate and key matches The checksums can be compared to verify that the certificate and key match.    openssl x509 -noout -modulus -in server.crt | openssl md5    openssl rsa -noout -modulus -in server.key | openssl md5 Verifying that a Certificate is issued by a CA Verify that a certificate was issued by a specific CA, given that CA's certificate    openssl verify -verbose -CAfile cacert.pem server.crt server.crt: OK

How to create a new user and database privileges on PostgreSQL

Task: Buatlah username dengan nama sysadmin7 dengan database monitoringdb7 Solution: Setelah PostgreSQL Database Server sudah terinstall dengan baik kemudian login dengan perintah berikut: #su - postgres maka akan masuk ke terminal berikut -bash-4.2$ Kemudian kerjakan langkah-langkah berikut Creating user -bash-4.2$createuser <username> Creating Database -bash-4.2$createdb <dbname> Giving the user a password -bash-4.2$postgres psql postgres=#alter user <username> with encrypted password '<password>'; Granting privileges on database postgres=#grant all privileges on database <dbname> to <username > ; Exit postgres=#\q Untuk login sesuai dengan username yang tadi sudah dibuat gunakan perintah berikut: Login dengan nama db dan usernamenya -bash-4.2$psql monitoringdb7 -U sysadmin7 psql (10.4) Type "help" for help. Melihat tabel monitoringdb7=> \d Did not find any relations. Exit mo

Make sure that firewall operates in stateful mode

Work task: Make sure that firewall operates in stateful mode using iptables Workaround: iptables -P INPUT DROP iptables -P FORWARD DROP iptables -P OUTPUT DROP iptables -A INPUT -m state --state ESTABLISHED,RELATED -j ACCEPT iptables -A FORWARD -m state --state ESTABLISHED,RELATED -j ACCEPT iptables -A OUTPUT -m state --state ESTABLISHED,RELATED -j ACCEPT Letakkan rule dibagian paling atas, karena iptables akan membaca rule secara berurutan, setelah rule-rule iptables diatas, selanjutnya tinggal allow service-service yang ingin digunakan, misalnya: # Allow remote ssh and http access iptables -A INPUT -p tcp --dport 22 -j ACCEPT # ssh iptables -A INPUT -p tcp --dport 80 -j ACCEPT # http # Allow DNS lookups to be initiated from this server iptables -A OUTPUT -p udp --dport 53 -j ACCEPT # dns iptables -A OUTPUT -p tcp --dport 53 -j ACCEPT # dns

Pembahasan LKS ITNSA hal-hal yang perlu diperhatikan dan diantisipasi

-Terkadang hardskills sudah terkuasai dengan baik, segala materi sudah dicoba, namun kurang fokus banyak point-point yang terlewat sehingga pada saat kompetisi kurang maksimal dalam mengerjakan. -Tertekan oleh waktu juga membuat ada beberapa konfigurasi yang belum sempat dikerjakan. -Konfigurasi yang dikerjakan tidak sesuai/salah pemahaman dengan instruksi pada test project sehingga apa yang dikerjakan juga sia-sia/tidak mendapatkan point pada marking scheme/skema penilaian yang dilakukan oleh juri. -Untuk mengantisipasi hal-hal diatas perlu berlatih dan berlatih sehingga pada saat kompetisi hanya melakukan pengulangan apa yang pernah dilatih di sekolah, tidak menjadikan kompetisi menjadi beban, menganggap pada saat kompetisi hanya perulangan apa yang sudah dikuasai dilatih di sekolah. Saya kira semuanya sudah tahu masalah-masalah klasik diatas dan solusinya pun sudah pada tau yaitu simple "Berdoa dan Berlatih" "Practice doesn't make perfect. Per

Pembahasan LKS ITNSA IIS HTTP HTTPS Windows Server Core

Gambar
Berikut langkah-langkah untuk konfigurasi IIS HTTP HTTPS Windows Server Core Sebelumnya konfigurasi dulu Remote Management agar IIS di Server Core bisa di remote dari windows GUI dengan Server Manager dan IIS Server Remote Konfigurasi CA dan webserver template https://nciptandani.blogspot.com/2018/08/pembahasan-itnsa-module-b-windows-ca.html Video 1 Membuat website baru HTTP di IIS dengan tampilan website sederhana Video 2 Membuat certificate di CA dan kemudian import di Server Core dengan Certutil via cmd Video 3 IIS Binding HTTPS

Version in “./docker-compose.yml” is unsupported. You might be seeing this error because you're using the wrong Compose file version

Problem: Version in “./docker-compose.yml” is unsupported. You might be seeing this error because you're using the wrong Compose file version Solution: Upgrade docker-compose step1: $which docker-compose /usr/bin/docker-compose step2: $sudo rm /usr/bin/docker-compose step3: curl -L https://github.com/docker/compose/releases/download/1.20.0/docker-compose-`uname -s`-`uname -m` -o /usr/bin/docker-compose step4: chmod +x /usr/bin/docker-compose

Download driver laptop

Dalam komputer, driver adalah program komputer yang mengoperasikan dan mengontrol jenis perangkat tertentu yang ada didalam komputer atau perangkat tambahan yang dipasang ke komputer. Agar perangkat tersebut berjalan dengan baik maka perlu di install driver. Berikut contoh website untuk mendownload driver secara resmi untuk laptop lenovo thinkpad series https://pcsupport.lenovo.com/us/en/products/laptops-and-netbooks/thinkpad-x-series-laptops/thinkpad-x240/downloads Untuk perangkat komputer tambahan biasanya saat membeli perangkat tersebut driver terdapat pada CD/DVD atau bisa ke website resmi nya.

Change hostname and FQDN on debian

On Debian, the hostname is set at startup to the script /etc/init.d/hostname.sh which uses the file /etc/hostname. We can use this file to update the computer hostname and its FQDN (fully qualified domain name). Caution: in the /etc/hosts file, the hostname and FQDN order must be respected. ~$ echo "my-computer" > /etc/hostname ~$ echo "127.0.0.1 my-computer.my-domain.ext my-computer localhost" > /etc/hosts ~$ /etc/init.d/hostname.sh You can check the change with the following lines: ~$ hostname my-computer ~$ hostname --fqdn my-computer.my-domain.ext The old hostname may still be present in the command line prompt. Just logoff then login to make it dissapear Name Resolution the hosts entry in /etc/nsswitch.conf is used for resolving host names, this line is configured as: hosts:      files dns This means that when when the resolver functions look up hostnames or IP address, they first check for an entry in the /etc/hosts file and next

How to configure mailbox limit Postfix

Gambar
Work task: Limit mailbox for each user to 1MB How to configure: Limit size in bytes Find & edit /etc/postfix/main.cf as follow:    mailbox_size_limit = 1024000    message_size_limit = 1024000 ~#etc/init.d/postfix restart How to mark: #postconf mailbox_size_limit #postconf massage_size_limit Output: mailbox_size_limit = 1024000 message_size_limit = 1024000 Additional Proof: Screencast berikut test postfix message mailbox size using mail client CLI mutt

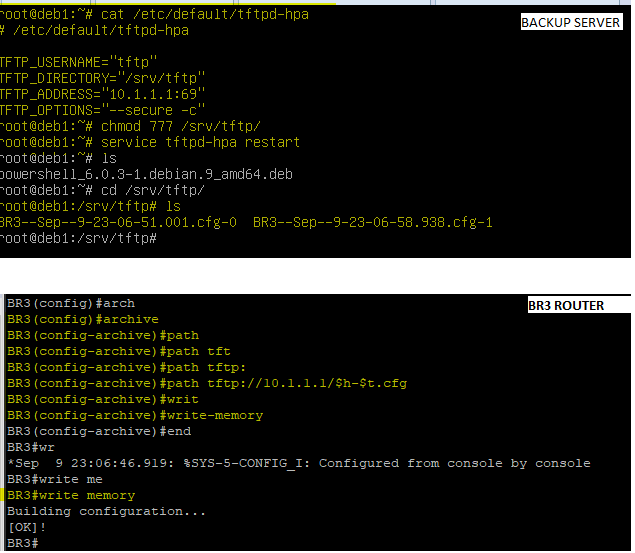
How to configure backup Cisco router configuration to TFTP

Gambar
Work Task: Configure configuration backup on BR3 router: a. Backup copy of running configuration should be automatically saved on BACKUP server using TFTP each time configuration is saved (copied to startup); b. Use following naming convention for backup files: <hostname>-<time>.cfg Location for configuration backup files is /srv/tftp/ on BACKUP server Configuration screenshot:

Cara Cek Konfigurasi Software Linux Server

Konfigurasi akan hafal sendirinya ketika sering berlatih, lebih tepatnya familiar. Untuk di linux sendiri terdapat manual page, /usr/share doc yang bisa dimanfaatkan untuk melihat konfigurasi ketika lupa dan ketika melakukan konfigurasi terkadang terdapat misconfiguration, entah itu kurang tanda baca atau ada script yang tidak tepat, berikut cara-cara untuk melakukan cek konfigurasi yang dilakukan. Silakan dicoba-coba perintah-perintah dibawah ini, biasanya saat service restart sofware_name   terdapat info failed, nah perlu dicek konfigurasi dimana letak kesalahannya,  ada beberapa cara seperti melihat log di /var/log/... dan cek dengan perintah Webserver apache #apachectl configtest Webserver nginx #nginx -t DNS Bind9 #named-checkconf  ... FREERADIUS #freeradius -CX LOAD BALANCER HAPROXY #service haproxy configtest MAIL POSTFIX #postconf -d FILE SERVER SAMBA #testparm VPN OPENVPN openvpn --config /path/to/server.conf PROFTPD proft

Cara upgrade Debian 9

Upgrade yang saya lakukan adalah dari Debian 9.2 ke 9.5 cek debian version dengan perintah lsb_relesea -a untuk upgrade caranya cukup simple, pertama pastikan repository sudah terkonfigurasi dengan baik, kemudian tinggal jalankan perintah apt-get update apt-get dist-upgrade reboot cek kembali lsb_release -a

Contoh konfigurasi iptables untuk DMZ

Contoh konfigurasi iptables untuk DMZ # set the default policy to DROP iptables -P INPUT DROP iptables -P OUTPUT DROP iptables -P FORWARD DROP # to configure the system as a router, enable ip forwarding by sysctl -w net.ipv4.ip_forward=1 # allow traffic from internal (eth0) to DMZ (eth2) iptables -t filter -A FORWARD -i eth0 -o eth2 -m state –state NEW,ESTABLISHED,RELATED -j ACCEPT iptables -t filter -A FORWARD -i eth2 -o eth0 -m state –state ESTABLISHED,RELATED -j ACCEPT # allow traffic from internet (eth1) to DMZ (eth2) iptables -t filter -A FORWARD -i eth1 -o eth2 -m state –state NEW,ESTABLISHED,RELATED -j ACCEPT iptables -t filter -A FORWARD -i eth2 -o eth1 -m state –state ESTABLISHED,RELATED -j ACCEPT #redirect incoming web requests at eth1 (200.0.0.1) of FIREWALL to web server at 192.168.20.2 iptables -t nat -A PREROUTING -p tcp -i eth1 -d 200.0.0.1 –dport 80 -j DNAT –to-dest 192.168.20.2  iptables -t nat -A PREROUTING -p tcp -i eth1 -d 200.0.0.1 –dport 443 -j

Konfigurasi User Disk Quota

Gambar
Contoh soal: - Tambah sebuah disk, jadikan sebuah partisi dengan file system ext4, mount di /data - Buat user dengan direktori di /data/[user] - Terapkan quota untuk user Jawab: Configuration summary root@nas-srv1:~#apt get install quota quotatool root@nas-srv1:~#pico /etc/fstab ... /dev/sdb1 /data ext4 defaults,usrquota 0 0 root@nas-srv1:~#reboot root@nas-srv1:~#quotacheck -um /data root@nas-srv1:~#quotaon -uv /data root@nas-srv1:~#quotaon -p -a root@nas-srv1:~#edquota -u nasohi #set quota for a user 'nasohi' # specify quota. the example below set 1G for it User            used    soft    hard  grace    used  soft  hard  grace ---------------------------------------------------------------------- nasohi   --      0    1024000 1024000              0     0     0 root@nas-srv1:~#repquota -a Screencast:

Konfigurasi DFS Replication

Gambar
DFS Create a Namespace with the name “dfs” Add JKT-DC1 as the second server for this Namespace Create DFS links for the department shares (Helpdesk, Technician, Manager) Create DFS Replication to implement a backup of the department shares on JKT-DC1. The shares should be replicated like this: - JKT-DC2: D:\shares\departments\Helpdesk -> JKT-DC1: C:\backup\Helpdesk - JKT-DC2: D:\shares\departments\Technician -> JKT-DC1: C:\backup\Technician - JKT-DC2: D:\shares\departments\Manager -> JKT-DC1: C:\backup\Manager 1. Install DFS Namespace dan DFS Replication di server-server yang akan digunakan. 2. Konfigurasi DFS Namespace, buka DFS Management, klik kanan pada menu Namespaces, pilih New Namespace, masukkan namespace sesuai yang ditentukan pada work task. 3. Konfigurasi DFS Replication di salah satu server, maka konfigurasi akan tercopy di member server lainnya, berikut screencast nya. Screencast nya silent mode, silakan diamati, ini sebagai referensi aja. Semakin ba

Import Bulk Users to AD from CSV file

Gambar
   Ada beberapa cara untuk import bulk users ke AD, kali ini cara menggunakan powershell ISE, berikut code nya, silakan disesuaikan dengan attribute yang ada di file CSV, jika file masih dalam bentuk Excel diubah dulu ke CSV (comma delimited), jangan lupa buat OU dan Group terlebih dahulu, jalankan code di powershell ISE.

Telephony Service Configuration

Gambar
Telephony Service Configure max 5 ephone and max 10 ephone-dn Number 888 is used for paging all phones of the company Configure button 2 on IP Phone to call directly to paging extension Configure a speed dial button to call the paging extension Tutorial: Paging Example: Speed dial Example: ephone 10  speed-dial 1 888 label "Paging" https://www.cisco.com/c/en/us/td/docs/voice_ip_comm/cucme/admin/configuration/manual/cmeadm/cmepage.html https://www.slideshare.net/ipmaxsrl/ccme-how-to-sccp-enabling-a-personal-speed-dial-entry https://www.cisco.com/c/en/us/td/docs/voice_ip_comm/cucme/admin/configuration/manual/cmeadm/cmespeed.pdf

Work Task Remote Desktop Services

Gambar
Work Task: ▪ Install Remote Desktop Services - Do not install RD Licensing component ▪ Configure web-access for terminal services ▪ The RDS login page should be accessible by entering the url https://rds.jakarta.net ▪ Make sure only users RDS_user1 and RDS_user2 are able to login via RDP ▪ Publish Wordpad on the web-portal of RemoteApp for the domain user “RDS_user1” ▪ Publish Calculator on the web-portal of RemoteApp for the domain users “RDS_user2” Marking: 1. RDS - connection open browser, try to access https://rds.jakarta.net, Yang perlu diperhatikan:     1. Karena by default masih  https://rds.jakarta.net/RDweb,  untuk akses menggunakan URL https://rds.jakarta.net perlu konfigurasi di IIS, lihat screencast dibawah.     2. Karena di Work Task belum ada instruksi no certificate warning maka tidak apa-apa, jika di work task terdapat no certificate warning maka perlu certificate yang di signed oleh server CA dan trusted di semua PC anggota domain. 2. RDS - authen

Software untuk mendukung belajar ITNSA

Berikut website resmi untuk mendownload software-software ITNSA PROXMOX https://www.proxmox.com/en/downloads/category/iso-images-pve GNS3 https://github.com/GNS3/gns3-gui/releases VMWARE WORKSTATION https://www.vmware.com/products/workstation-pro/workstation-pro-evaluation.html VMWARE ESXI https://my.vmware.com/en/web/vmware/evalcenter?p=free-esxi6 PACKET TRACERT https://www.netacad.com/courses/packet-tracer VIRTUALBOX https://www.virtualbox.org/wiki/Downloads VIRL https://learningnetworkstore.cisco.com/virtual-internet-routing-lab-virl/cisco-personal-edition-pe-20-nodes-virl-20

Virtual host berjalan di port 8080 menggunakan software apache2 dengan OS: Centos7

Soal: Buatlah sebuah virtual host berjalan di port 8080 menggunakan software apache2 dengan OS: Centos7, buat file index.html, dan simpan log access dan error di /var/log/httpd/dashboard2 Jawab: #yum install httpd Tambah script Listen8080 dibawah Listen80 di file berikut #vi /etc/httpd/conf/httpd.conf Listen80 Listen8080 #cd /var/www/html #mkdir dashboard2 #chown apache.apache dashboard2 -R #cd dashboard2 #mkdir public #echo "Welcome to Dashboard2" > public/index.html #mkdir /var/log/httpd/dashboard2 #vi /etc/httpd/conf.d/dashboard2.conf <VirtualHost *:8080> ServerAdmin webmaster@sysops.com ServerName 107.102.182.128:8080 DocumentRoot /var/www/html/dashboard2/public/ ErrorLog /var/log/httpd/dashboard2/error.log CustomLog /var/log/httpd/dashboard2/access.log combined </VirtualHost> #systemctl restart httpd

SQLSTATE[42000]: Syntax error or access violation: 1115 Unknown character set: 'utf8mb4'

Error: SQLSTATE[42000]: Syntax error or access violation: 1115 Unknown character set: 'utf8mb4' Solution: Go to config/database.php and replace these two lines with these 'charset' => 'utf8',  'collation' => 'utf8_unicode_ci',

GRANT ACCESS TO A DATABASE FROM REMOTE

Edit my.cnf Supaya database server bisa diremote dari pc lain, beri tanda pagar pada script: #skip-networking dan edit bind-address=YOUR-SERVER-IP Buatlah sebuah database itnsa untuk competitior1 dengan password: Skill39 diakses dari IP 1.2.3.4 : Jawab: mysql> CREATE DATABASE itnsa; mysql> GRANT ALL ON itnsa.* TO competitor1@'1.2.3.4' IDENTIFIED BY 'Skill39'; Tambahan Cara edit mysql> use mysql; mysql> update db set Host='1.2.3.5' where Db='itnsa'; mysql> update user set Host='1.2.3.5' where user='competitor1'; mysql> update user set password=PASSWORD("NEWPASSWORD") where user='it1'; mysql> flush privileges; Cara akses #mysql -u root -h YOUR-SERVER-IP -p

Cara Install Laravel 5.7 di Linux

Sebelumnya pastikan webserver dan PHP sudah terinstall dan berjalan dengan baik. Selanjutnya install Composer(dependency manager PHP) #curl -sS https://getcomposer.org/installer | php #mv composer.phar /usr/local/bin/composer #chmod +x /usr/local/bin/composer #cd /var/www/html/ #sudo composer create-project --prefer-dist laravel/laravel dashboard #cd dashboard #php artisan key:generate #chown -R www-data.www-data /var/www/html/dashboard #chmod -R 755 /var/www/html/dashboard #chmod -R 777 /var/www/html/dashboard/storage Selanjutnya konfigurasi database yang akan digunakan oleh aplikasi Laravel #mysql -u root -p mysql> CREATE DATABASE dashboard; mysql> GRANT ALL ON laravel.* to 'laravel'@'localhost' IDENTIFIED BY 'Skill39'; mysql> FLUSH PRIVILEGES; mysql> quit Buka file .env di direktori laravel, sesuaikan seperti berikut: DB_CONNECTION=mysql DB_HOST=127.0.0.1 DB_PORT=3306 DB_DATABASE=dashboard DB_USERNAME=laravel DB_PA

How to install PHP 7 on Centos 7

Berikut adalah ringkasan langkah-langkah installasi PHP di Centos 7 #yum install https://dl.fedoraproject.org/pub/epel/epel-release-latest-7.noarch.rpm #yum install http://rpms.remirepo.net/enterprise/remi-release-7.rpm #yum install yum-utils #yum-config-manager --enable remi-php70   atau #yum-config-manager --enable remi-php71  atau #yum-config-manager --enable remi-php72 Install PHP dan beberapa modul #yum install php php-mcrypt php-cli php-gd php-curl php-mysql php-ldap php-zip php-fileinfo Cek #php -v

How to upgrade Centos

e.g. to update your 7.4.1708 system to 7.5.1804, use the following procedure: First, ask your system what version you’re on now: $ cat /etc/redhat-release CentOS Linux release 7.4.1708 (Core) Next, upgrade with: $ sudo yum clean all $ sudo yum upgrade $ sudo systemctl reboot Finally, once this is done, you can verify that you’re running the latest build with: $ cat /etc/redhat-release CentOS Linux release 7.5.1804 (Core)

Cara zip/unzip di linux command line

Cukup mudah untuk zip di linux command line, kali ini menggunakan perintah zip #apt-get install zip caranya buatlah sebuah folder dan masukkan file-file kedalam folder tersebut untuk dizip misalnya ada file1.txt file2.jpg file3.doc buatlah folder dokumen, #mkdir dokumen #cp file1.txt file2.jpg file3.doc dokumen atau # cp file* dokumen Selanjutnya tinggal gunakan perintah zip, dengan format zip -r nama_dokumen.zip folder_dokumen option -r artinya recursive #zip -r dokumen.zip dokumen Untuk unzip gunakan perintah # unzip dokumen.zip

Konfigurasi mail client Mutt

Mutt adalah mail client dengan tampilan CLI #apt-get install mutt Login user, buatlah file konfigurasi baru untuk mutt di ~/.muttrc dengan script berikut: set realname = "Nasohi Ciptandani" set from = "nasohi@skill39.id" set use_from = yes set envelope_from = yes set smtp_url = "smtp://nasohi@skill39.id@smtp.skill39.id:25/" set smtp_pass = "p4ssw0rd" Simpan file konfigurasi diatas Berikut mencoba mengirim email melalui command line #mutt -s "Test from mutt" unyil@skill39.id < /tmp/message.txt

Pembahasan LKS ITNSA MAIL IMAP SMTP Authentication LDAP

Gambar
Authentication has to be done through LDAP Make sure that the corresponding local user do not exist and  Make sure LDAP user cannot login locally Untuk membuat SMTP authentication Postifix membutuhkan Cyrus-SASL atau Dovecot-SASL ( http://www.postfix.org/SASL_README.html ) Ada beberapa cara untuk menjawab soal Authentication has to be done through LDAP   bisa dengan: SMTP Authentication (SASL Authentication dengan perantara cyrus/sasl2-bin kemudian libsasl2-modules-ldap) SMTP Authentication (SASL Authentication dengan perantara dovecot kemudian dovecot-ldap) SMTP Authentication dengan Courier SMTP Authentication (SASL Authentication dengan perantara dovecot kemudian libnss-ldap) Berikut adalah langkah-langkah dengan cara 4. SMTP Authentication (SASL Authentication dengan perantara dovecot kemudian libnss-ldap). Secara default dovecot menggunakan system users sehingga cukup menggunakan libnss-ldap untuk melakukan proses autentikasi ke ldap server, libnss-ldap dikonfigu

Bash scripting backup task scheduler

Berikut adalah cara membuat task scheduler di linux tanpa menggunakan crontab, banyak cara yang bisa dilakukan namun kali ini akan menggunakan bash script. Script nya sederhana seperti dibawah ini ada 2 file backup-db.sh dan backup-db-scheduler.sh Untuk tutorial ini membahas  backup-db-scheduler.sh #!/bin/bash while true do sleep 2m bash /opt/backup-db.sh done Simpan script diatas misalnya dengan nama backupdbscheduler.sh Kemudian chmod +x backup-db-scheduler.sh Script diatas akan menjalankan script backup-db.sh setiap 2 menit. Jalan script di background dengan perintah #./backup-db-scheduler.sh & Untuk lihat process yang di background ps aux | grep process_name Untuk menghentikan process yang diinginkan kill -9 process_id Simpan di rc.local agar ketika server reboot bisa berjalan kembali scriptnya. Tambahkan di /etc/rc.local script dibawah ini diatas script exit 0 /opt/backup-db-scheduler.sh

WORK TASK SERVER JKT-DC1

Gambar
Configure the server with the hostname, domain and IP specified in the appendix My computer -> properties RUN -> ncpa.cpl Install/Configure Modify the default firewall rules to allow ICMP (ping) traffic CMD -> netsh firewall set icmpsetting 8 enable Active Directory Configure this server as the initial domain controller for jakarta.net Configure an ONE -WAY (Forest) trust between the domains jakarta.net and mataram.net - Users from jakarta.net must have access to resources from mataram.net but not vice versa

Simple request certificate to CA using certreq

There are some ways to make a certificate, you can use web enrollment, command enrollment, GUI enrollment. Below steps are using command Open an elevated Powershell session Launch Notepad Add the following lines to the new file: [NewRequest] Subject="cn=yourServer.yourDomain.com" Exportable=TRUE [RequestAttributes] CertificateTemplate="Web Server" Save the file as something ending in .inf, for example iis.inf Run: certreq -new d:\temp\iis.inf d:\temp\request.txt Run: certreq -submit d:\temp\request.txt d:\temp\iiscert.cer Run: certreq -accept d:\temp\iiscert.cer

Enable remote management windows server core

Berikut perintah nya netsh advfirewall set currentprofile settings remotemanagement enable Jalankan perintah diatas di windows server core, kemudian  lakukan di windows GUI untuk meremote windows firewall pada server core. Dengan cara  buka MMC, add snap-in windows firewall pilih another computer, masukkan nama/ip windows server core. Untuk rule remote disk management gunakan perintah berikut, jalankan perintah berikut di windows server core dan GUI. netsh advfirewall firewall set rule group=”Remote Volume Management” new enable=yes Dan banyak hal-hal lainnya yang bisa diremote pada server core dari server GUI.

Remote Server Administration Tools for Windows 10

Ini adalah tool yang digunakan untuk melakukan konfigurasi/management ke windows server secara remote, untuk tool nya bisa di download di link berikut: https://www.microsoft.com/en-us/download/details.aspx?id=45520 Join windows 10 ke domain windows server, kemudian install dan gunakan tool RSAT menggunakan Administrator.