Postingan

Cara Request Certificate ke Let's Encrypt

Gambar
Let's encrypt merupakan salah satu provider yang menyediakan SSL secara gratis Untuk langkah-langkah nya cukup simple untuk mendapatkan sertifikat nya Tool untuk request sertifikat ke let's encrypt menggunakan certbot Untuk tutorial kali ini akan menginstall certbot melalui Python virtualenvironment, pastikan di laptop sudah ada Python, untuk versi bisa menyesuaikan kemudian jalankan perintah berikut: Install Certbot bisa melalui python-PIP python3.8 -m venv virtualenv source virtualenv/bin/active pip3 install certbot Untuk mendapatkan sertifikat dari Let's Encrypt, server let's encrypt memvalidasi bahwa Anda mengontrol nama domain dalam sertifikat tersebut menggunakan "challenge", sebagaimana ditentukan oleh standar ACME. Ada beberapa langkah bisa menggunkan DNS dan HTTP namun untuk kali ini menggunakan DNS, buatlah record sesuai dengan yang ada pada hasil perintah berikut: certbot certonly --config-dir . --work-dir . --logs-dir . --manual -d www.example.com

Table of Contents

🖳BASIC IP & HOSTNAME Change hostname and FQDN on debian 🗄DIRECTORY SERVICES Import Bulk Users to AD from CSV file Install, Integration with OpenLDAP ⩤DNS Pembahasan IT Network Systems Administration Module A DNS (Forward Zone, Reverse Zone, CNAME, MX, Split View) 🖧PUBLIC KEY INFRASTUCTURE / CERTIFICATES Microsoft Active Directory Certificate Services CA Web Enrollment How to make an CA, Intermediate CA / Sub CA, and Server Certificate with OpenSSL command How to make a root CA 🕸WEB SERVER Cara konfigurasi Web Server IIS di Windows Server Core dengan PowerShell How to configure HTTPS in IIS Windows Server via PowerShell Redirect IP ke domain, non-www ke www dengan htaccess di apache2 How to fix error “Could not reliably determine the server’s fully qualified domain name using 127.0.1.1 for ServerName" on apache2 📧MAIL SERVER Pembahasan LKS ITNSA MAIL IMAP SMTP Authentication LDAP Konfigurasi mail client Mutt Configure Postfix to use Gmail as a Mail Relay on Fedora Konfigur

Dasar-dasar nftables

Gambar
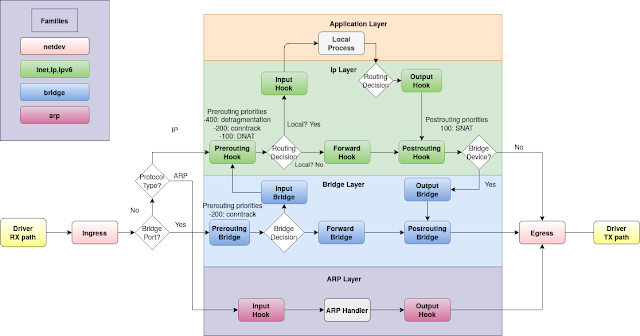
Nftables adalah firewall pengganti iptables dari netfilter framework. https://wiki.debian.org/nftables https://netfilter.org/projects/nftables/ https://wiki.nftables.org/wiki-nftables/index.php/Moving_from_iptables_to_nftables nftables is a netfilter project that aims to replace the existing {ip,ip6,arp,eb}tables framework. It provides a new packet filtering framework, a new user-space utility (nft), and a compatibility layer for {ip,ip6}tables. It uses the existing hooks, connection tracking system, user-space queueing component, and logging subsystem of netfilter.  https://wiki.archlinux.org/title/nftables Diagram untuk memahami konsep nftables: https://wiki.nftables.org/wiki-nftables/index.php/Netfilter_hooks Bisa diperhatikan misalnya: ada paket masuk ke dalam router/server dicek dulu apakah interface port nya bridge atau tidak jika tidak kemudian jenis filter protocol apa yang ingin dipakai, misalnya protokol IP maka fokus saja ke background hijau didiagram di atas. Ini sesuai den

How To make sure any file or folder created in /var/www/html gets automatically owned by www-data

To make sure any file or folder you create in /var/www/html gets automatically owned by www-data you can use inotify , it's like cron but monitors folders/files for changes in attributes, file creations, modifications and much more. First install it with: $ sudo apt-get install incron Allow root to use incron by opening /etc/incron.allow with: $ sudo vim /etc/incron.allow and add root to the file, then save and exit. Edit your incrontab with: $ sudo incrontab -u root -e and add the following line to it: /var/www/html IN_CREATE /bin/chown -R www-data:www-data /var/www/html/ save and exit. Now as soon as a file is created in the /var/www/html directory it will automatically set ownership to www-data:www-data. Explanation of the line in incrontab: /var/www/html is the directory that will be monitored. IN_CREATE will watch for created files. It's the file change mask. /bin/chown -R www-data:www-data /var/www/html / is the command/action to execute.

How to install terragrunt

Terragrunt is a thin wrapper that provides extra tools for keeping your configurations DRY, working with multiple Terraform modules, and managing remote state. https://terragrunt.gruntwork.io / Steps to install terragrunt command: 1. Download from releases page   https://github.com/gruntwork-io/terragrunt/releases 2. Download the binary for your OS: e.g., On Linux wget https://github.com/gruntwork-io/terragrunt/releases/download/v0.37.1/terragrunt_linux_amd64  3. Add execute permissions to the binary. E.g., On Linux chmod u+x terragrunt_linux_amd64 4. Put the binary somewhere on your PATH. E.g., On Linux  mv  terragrunt_linux_amd64  /usr/local/bin/terragrunt 5. Check installation terragrunt --version

Cara install Python dan virtualenv

 Install Python contoh install python 3.7, python3-distutils python3-pip, python3-virtualenv. Update paket sudo apt update Install Common Dependencies sudo apt install software-properties-common Menambahkan repository  https://launchpad.net/~deadsnakes/+archive/ubuntu/ppa sudo add-apt-repository ppa:deadsnakes/ppa Install Python sudo apt install python3.7 untuk versi python lain bisa sesuikan saja misal python3.8, python3.9 Install module python3.7-disutils dan  Python3-pip sudo apt-get install python3.7-distutils python3-pip python3-virtualenv Dibawah contoh script ansible dengan case menginstall module proxmoxer untuk manage server proxmox: --- - name: Setup Proxmoxer   hosts: server1   become: yes   tasks:     - name: Add repository       apt_repository: repo="ppa:deadsnakes/ppa"     - name: Install Python packages       apt:         pkg:           - software-properties-common           - python3.7           - python3.7-distutils           - python3-virtualenv           -

Parsing Json in Golang

Concept: []Json array ---->[]Byte array ----> Struct Syntax: func Unmarshal(data []byte, v interface{}) error Code: // Golang program to illustrate the // concept of parsing JSON to an array package main import (     "encoding/json"     "fmt" ) // declaring a struct type Competitors struct {     // defining struct variables     Username string     School   string     Online   bool     Score     int } // main function func main () {     // defining a struct instance     var competitors []Competitors     // JSON array to be decoded     // to an array in golang     Data := [] byte ( `     [         {"username": "competitor1", "school": "SMK Swasta 1", "online": true, "score": 987},         {"username": "competitor2", "school": "SMK Negeri 7", "online": false, "score": 432},         {"username": "competitor3", "