Postingan

Menampilkan postingan dari Mei, 2015

Cara menginstall cisco ASA di GNS3

Gambar
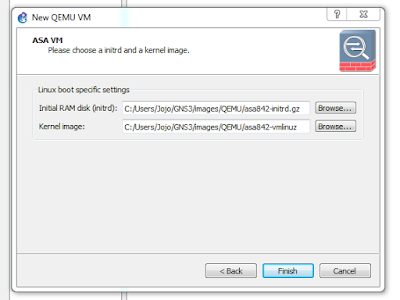
GNS3 is one of the network simulation software very useful and powerful, many network devices can be simulated, here's how to install Cisco ASA. My Practice using GNS3 1.3.3, ASA 8.4 1. Download the cisco asa source files  asa842-k8.bin   and  asa842-vmlinuz 2. Extract them and place them in the GNS3 images directory. 3. For example : C:\Users\<user name>\GNS3\images\QEMU\ 4. Go to Edit -> Preference -> QEMU -> QEMU VMs 5. Click New -> Give Name -> Set typenetwork devices can be simulated, here's how to install cisco asa

Cara menggunakan editor VI

Essential Vi Commands Open a file: #vi filename To go into edit mode: #press ESC and type I To go into command mode: #press ESC To save a file : #press ESC and type :w fileName To save a file and quit : #press ESC and type :w

How to configure IPv6 on Tiny Core Linux

I usually use Tiny Core Linux in GNS3 for testing network connectivity because it’s lightweight and boots quickly. Here’s a guide on adding IPv6 addresses and routes on Tiny Core Linux. 1. Adding an IPv6 Address There are two common ways to add an IPv6 address: a. Using ip command Usage: # /sbin/ip -6 addr add <ipv6address>/<prefixlength> dev <interface> Example: # /sbin/ip -6 addr add 2001:0db8:0:f101::1/64 dev eth0 b. Using ifconfig Usage: # /sbin/ifconfig <interface> inet6 add <ipv6address>/<prefixlength> Example: # /sbin/ifconfig eth0 inet6 add 2001:0db8:0:f101::1/64 2. Show IPv6 Address You can verify the IPv6 address assigned to an interface with either: # /sbin/ifconfig eth0 or # /sbin/ip -6 addr show dev eth0 3. Adding an IPv6 Route To add an IPv6 route via a gateway, there are two options: a. Using ip Usage: # /sbin/ip -6 route add <ipv6network>/<prefixlength> via <ipv6address> dev <device...

Cara mount, eject & safely remove flashdisk/pendrive di linux

Kalau linux yang kita install mode CLI, berikut adalah cara mount, eject & safely remove flashdisk di linux : 1. Tancapkan flashdisk/pendrive 2. #fdisk -l (untuk memeriksa letak/nama device flashdisk tersebut) 3. #mkdir /media/flashdisk  (membuat folder tempat mount flashdisk) 3. #mount /dev/sdb1 / media/flashdisk (mount flashdisk ke media/flashdisk dan sdb1 adalah nama/letak devicenya). 4. #cd /media/flashdisk (masuk dalam media flashdisk) 5. #ls (melihat isi flashdisk, disini sudah bisa mengakses isi flashdisk)