Cara menginstall cisco ASA di GNS3
GNS3 is one of the network simulation software very useful and powerful, many network devices can be simulated, here's how to install Cisco ASA.
My Practice using GNS3 1.3.3, ASA 8.4
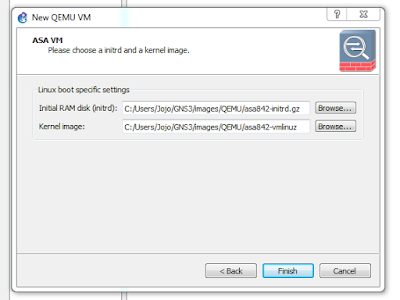
1. Download the cisco asa source files asa842-k8.bin and asa842-vmlinuz
2. Extract them and place them in the GNS3 images directory.
3. For example : C:\Users\<user name>\GNS3\images\QEMU\
4. Go to Edit -> Preference -> QEMU -> QEMU VMs
5. Click New -> Give Name -> Set typenetwork devices can be simulated, here's how to install cisco asa
6. Assign RAM (>=1024 MB)

My Practice using GNS3 1.3.3, ASA 8.4
1. Download the cisco asa source files asa842-k8.bin and asa842-vmlinuz
2. Extract them and place them in the GNS3 images directory.
3. For example : C:\Users\<user name>\GNS3\images\QEMU\
4. Go to Edit -> Preference -> QEMU -> QEMU VMs
5. Click New -> Give Name -> Set typenetwork devices can be simulated, here's how to install cisco asa
6. Assign RAM (>=1024 MB)


7. Change on column Kernel Command Line :
no-hlt -append ide_generic.probe_mask=0x01 ide_core.chs=0.0:980,16,32 auto nousb console=ttyS0,9600 bigphysarea=65536
8. Change on Options :
-vnc none -vga none -m 1024 -icount auto -hdachs 980,16,32
9. Press Ok. Then Drag Cisco ASA to workspace and Start
10. Open console, wait for the boot process.
11. Enter to privileged mode with enable command and activate license
You can activate the licenses using below codes:
enable
activation-key 0x4a3ec071 0x0d86fbf6 0x7cb1bc48 0x8b48b8b0 0xf317c0b5
activation-key 0xb23bcf4a 0x1c713b4f 0x7d53bcbc 0xc4f8d09c 0x0e24c6b6
wr
reload
~Good Luck & Enjoy your practices~

Komentar