Postingan

Menampilkan postingan dari 2019

How to configure PAM to allow/deny users login

Pada contoh ini adalah cara untuk filter user login ke sistem, misalnya hanya ingin user-user tertentu yang bisa masuk ke sistem GUI/Console Linux ini bisa dilakukan melalui file nano /etc/pam.d/common-auth Sebelum melakukan ini alangkah baiknya untuk dilakukan di server percobaan dan lakukan snapshoot karena jika terdapat salah konfigurasi bisa mengakibatkan gagal login ke sistem, tambahkan script dibawah ini dibagian paling bawah auth required pam_listfile.so item=user sense=allow file=/etc/pam.d/users.allow onerr=fail simpan setelah menambahkan script diatas. dan jangan lupa buat file users.allow di /etc/pam.d/ isikan user-user yang hanya boleh login ke sistem per baris, contoh: root user1 user2 user3 Kemudian buat misalnya adduser testuser1 Kemudian test logout sistem dan login dengan testuser1 maka tidak bisa karena belum terdaftar di /etc/pam.d/users.allow ,  login dengan root/user1/user2/user3 maka bisa login ke sistem. Ini juga ...
How to configure SSH Jump

Menggunakan SSH jump untuk akses ke server melalui server lain, begini contoh kasusnya.  Untuk mengakses SSH ke server B maka perlu lewat server A dulu. work-pc1 ~~~~~~ssh~~~~~~> naserver-bastion1 ~~~~~~ssh~~~~~~~> naserver-app1 Ini juga memiliki manfaat untuk naserver-app1 misalnya yang digunakan sebagai production app jadi tidak sembarangan host yang mengakses, hanya naserver-bastion1 yang bisa mengaksesnya. Bisa dikatakan juga naserver-bastion1 sebagai perantara untuk akses ke naserver-app1 . Berikut konfigurasinya: Simpan konfigurasi ini di client disini dengan nama work-pc1 menggunakan linux dengan user nasohi yang akan menyimpan informasi config ssh dan key nya. Simpan script di /home/nasohi/.ssh/config Host naserver-bastion1         HostName naserver-bastion1.idnux.id         IdentityFile /home/ nasohi /.ssh/ id_rsa         User nasohi         Port 2222 Host naserver-ap...

How to create a VM/Instance in AWS via CLI

Install AWS CLI curl "https://d1vvhvl2y92vvt.cloudfront.net/awscli-exe-linux-x86_64.zip" -o "awscliv2.zip" unzip awscliv2.zip sudo ./aws/install https://docs.aws.amazon.com/cli/latest/userguide/install-cliv2-linux-mac.html Configure AWS CLI aws configure https://docs.aws.amazon.com/cli/latest/userguide/cli-chap-configure.html Create a key-pair aws ec2  create-key-pair --key-name MyVMKey The output is an ASCII version of the private key and key fingerprint. You need to save the key to a file. https://docs.aws.amazon.com/AWSEC2/latest/UserGuide/ec2-key-pairs.html Create a security group aws ec2 create-security-group --group-name MySecurityGroup --description "My security group" Configure security group to allow SSH traffic aws ec2 authorize-security-group-ingress --group-name MySecurityGroup --protocol tcp --port 22 --cidr 0.0.0.0/0 Create an instance aws ec2 run-instances --image-id ami-061eb2b23f9f8839c --key-name Nasohi-VM...

ITNSA Network Troubleshooting

Kali ini saya akan memilih untuk menulis tentang network troubleshooting karena troubleshooting merupakan salah satu hal dimana setiap belajar/bekerja melakukan configuring terkadang sering menemukan beberapa masalah, atau bisa juga sudah mendapatkan hasil network yang sudah configured , selayaknya kita baru masuk ke perusahaan baru dan sudah terdapat network yang terkonfigurasi beserta service-service nya. Berikut beberapa tips yang mungkin berguna untuk network troubleshooting , tentu jangan lupa untuk teknik OSI/TCP-IP layer. Bisa baca-baca postingan ini  https://nciptandani.blogspot.com/2019/11/itnsa-tips-system-network.html 1. Cek interface status , apakah up/down . 2. Cek port duplex/speed, duplex auto, speed negotiation. 3. Cek peer to peer connection melalui ping, cek juga jalur per router pakai traceroute, namun terkadang ada router yang tidak memperboleh paket icmp sehingga tidak bisa terdeteksi hop mana saja yang dilalui. 4. Cek apakah ada Access-Lis...

ITNSA Tips System & Network Troubleshooting

Selain teknik troubleshooting per layer OSI/TCP-IP seperti di postingan ini  https://nciptandani.blogspot.com/2019/10/it-nsa-tips.html baca juga https://nciptandani.blogspot.com/2019/01/tips-troubleshooting-networksystems.html Teknik 5W + 1H juga bisa menjadi dasar dalam troubleshooting yang pertama W hat , perlu tahu problem pada services apa, apa di DNS, HTTP, VPN, ROUTING, IP dll. yang kedua Who, who ini user apa yang terkena impact dari problem , user di dalam network dan system bisa disimpan dicek local system , Active Directory , dll. Apakah ter disable , salah password , tidak punya role/permission ,dll. yang ketiga Where, perlu dicari dimana user dan services berada di server mana. Server-server mana saja yang terkoneksi baik secara network maupun services yang saling bergantung misal mail/vpn/webserver authentication yang terkoneksi ke LDAP s erver . Cek juga di network device apakah ada masasalah routing, authentication, encrypti...

How to manage iptables with netfilter-persistent

Gambar
As we may know that iptables is temporary command, it will be lost when rebooting so to manage the firewall rules on iptables we can use netfilter-persistent,  it can be used to add, edit and remove rules on files,  save,  and flush. This is the example video about managing the iptables rules, you can try by yourself with any rules you want on server, client or router.

IT NSA Tips

Configuration Kuatkan konsep setelah itu tinggal mencari konfigurasi sesuai vendor yang dibutuhkan misalnya konsep VPN, semua vendor akan menggunakan konsep VPN sama ada SSL VPN, IKEV VPN, L2TP/IPSEC VPN, namun cara konfigurasi tiap vendor yang berbeda-beda oleh karena itu butuh waktu untuk membaca dokumentasi dan googling. Begitu juga dengan konsep File sharing, DNS, Webserver, Virtualisasi, Live migration bisa menggunakan KVM, HYPER-V, VMWARE, salah satu contoh Load balancer bisa menggunakan cloud application load balancer dari salah satu cloud (Openstack, GCP, AWS, AliCoud, dan masih banyak service yang ada didalamnya)  yang bisa digunakan atau software load balancer haproxy, nginx. Storage bisa dari windows, linux, ceph, glusterfs, dll. Begitu banyak stack technology tinggal disesuaikan dengan kebutuhan bisa memakai fitur atau integrasi dari device, software, sistem operasi dan cloud. Troubleshooting Bisa menggunakan teknik OSI layer atau TCP/IP layer, untuk TCP/IP...

Iptables Firewall Stateless vs Statefull on Router

Iptables Firewall Stateless vs Statefull on Router Task: Create the firewall rule for IP 1.1.1.1 can access ssh server on 2.2.2.2 2 ways: 1. Stateless #iptables -P FORWARD DROP #iptables -A FORWARD -p tcp --dport 22 -s 1.1.1.1 -d 2.2.2.2 -j ACCEPT #iptables -A FORWARD -p tcp --sport 22 -s 2.2.2.2 -d 1.1.1.1 -j ACCEPT or 2. Statefull (recommended) #iptables -P FORWARD DROP #iptables -A FORWARD -p tcp -m state --state ESTABLISHED,RELATED -j ACCEPT #iptables -A FORWARD -p tcp --dport 22 -s 1.1.1.1 -d 2.2.2.2 -j ACCEPT

Docker commit

Docker commit used to reate a new image from a container’s changes. You need to commit the changes you make to the container and then run it. Try this example: sudo docker pull debian After pull image from docker hub, you can customize to fit your enviroment  in this example is just to try install apache2 sudo docker run debian apt-get update && apt-get install -y apache2 or you can access the bash with command: sudo docker run debian Check container id sudo docker ps -l Enter to the bash terminal sudo docker exec -it <container_id> bash  apt-get update && apt-get install -y apache2 exit bash terminal  exit Commit changes to the container: sudo docker commit <container_id> nasohi/www1 Now the container becomes the image, check with the following command: sudo docker images Then run the container: sudo docker run nasohi/www1 Another way is you can make docker file and use docker build Read also: ...

How to configure HTTPS in IIS Windows Server via PowerShell

Cara konfigurasi HTTPS di IIS Windows Server melalui PowerShell Untuk konfigurasi HTTP melalui PowerShell bisa baca disini  https://nciptandani.blogspot.com/2019/06/cara-konfigurasi-web-server-iis-di.html Untuk membuat server CA dan webserver sertifikat template https://nciptandani.blogspot.com/2018/08/pembahasan-itnsa-module-b-windows-ca.html Kemudian dari webserver sertifikat template tersebut bisa digunakan untuk membuat sertifikat, bisa melalui MMC -> Certificates -> Local computar -> Personal -> klik kanan ceritificates -> All tasks ->  request new certificate -> next -> pilih webserver template yang sudah dibuat -> kemudian isi informasi seperti common name, subject alternative name dengan benar. Sertifikat yang akan dipasang dengan format PFX, file sertifikat PFX ini bisa didapatkan dari server CA. Cara export PFX dari windows server CA  https://www.youtube.com/watch?v=m157RGX6S1g Kemudian import sertifikat tersebut ke...

Contoh pembahasan LKS ITNSA 2019 VPN Configuration

Pada tutorial kali ini akan mempraktekkan VPN  site to site  dengan menggunakan ASA, secara fungsi VPN  site to site  ini akan mengamankan jaringan antar site misalnya site kantor pusat dan kantor cabang yang melalui jaringan internet. Didalam pembuatan VPN site to site ini akan ada beberapa istilah seperti IKEV2, IPSEC,  Phase 1 parameters (Hash, Encryption, DH group, Authentication), Phase 2 parameters (Protocol, Encryption, Hash) . Yang perlu diperhatikan pada saat konfigurasi adalah parameter-parameter tersebut harus sesuai/ matching antar kedua router ASA. Sebelum melakukan konfigurasi VPN site to site IKE versi 2 dengan ASA pastikan terlebih dahulu koneksi IP nya bisa berjalan dengan baik. Contoh topologi  HQLAN---------FW1------------INTERNET--------------FW2----------BRLAN Kemudian lakukan langkah-langkah konfigurasi ini: Note: Pembahasan ini hanyalah contoh, untuk attribute,environment konfigurasi seperti  Topology, Hostname, ...

How to configur proftpd for webmaster

OS: Debian 10 Install an FTP-server using proftpd #apt-get install proftpd Change the user and group owner of /var/www is www-data and add full permission to user and group. #chown -R www-data:www-data /var/www/ #chmod -R 775 /var/www Add a user called "webmaster" with the password "$3curE" and the root directory is the same directory as the web-root /var/www #useradd -d /var/www -s /bin/false webmaster #passwd webmaster Add a webmaster user to the www-data group as primary group. #usermod -g www-data webmaster Configure proftpd.conf - User must not leave its home directory. - Disable shell access for webmaster. - When uploading files, the group is set to www-data. DefaultRoot                     ~ RequireValidShell           off #service proftpd restart

How to create SSH Key for connecting to the instance.

On Linux or macOS, we can generate a key with the ssh-keygen command. Open a terminal and then use the ssh-keygen command to generate a new key. Specify the -C flag to add a comment with your username. ssh-keygen -t rsa -f ~/.ssh/[KEY_FILENAME] -C [USERNAME] where: [KEY_FILENAME] is the name that you want to use for your SSH key files. For example, a filename of myserver-ssh-key generates a private key file named myserver-ssh-key and a public key file named myserver-ssh-key.pub . [USERNAME] is the username on the instance. This command generates a private SSH key file and a matching public SSH key with the following structure: ssh-rsa [KEY_VALUE] [USERNAME] where: [KEY_VALUE] is the key value that you generated. [USERNAME] is the user on instance that this key applies to. Restrict access to your private key so that only you can read it and nobody can write to it. chmod 400 ~/.ssh/[KEY_FILENAME] Locate the public SSH keys to add to instance. It  can be don...

Konfigurasi Libnss-LDAP

OS: Debian 10 Libnss-LDAP ini bisa dimanfaatkan sebagai perantara untuk autentikasi ke LDAP server yang akan digunakan sebagai user untuk login system, file server, mail server, dll. Sebelumnya pastikan dulu LDAP Server bisa di query dengan baik dengan perintah berikut #ldapsearch -h <ldapserver> -b dc=<your>,dc=<domain> -x uid=<username> Untuk installasi paket nya seperti berikut: #apt-get install libnss-ldapd konfigurasi libnss-ldapd Pada saat installasi libnss-ldapd akan muncul dialog untuk mengisi informasi LDAP Server dan LDAP server tersebut akan digunakan sebagai apa pada sistem untuk autentikasi user cukup memilih passwd Dialog pada saat  instalasi juga masih bisa di konfigurasi melalui #nano /etc/nslcd.conf uri ldap://192.168.1.1 # The search base that will be used for all queries. base dc=idnux,dc=com # The LDAP protocol version to use. #ldap_version 3 # The DN to bind with for normal lookups. binddn cn=admin,dc=idnux,dc...

How to make an CA, Intermediate CA / Sub CA, and Server Certificate with OpenSSL command

Gambar
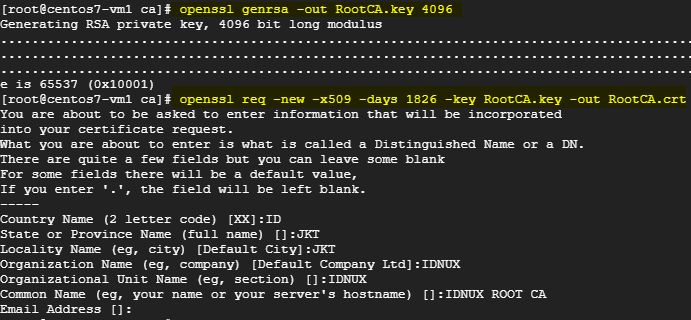
- Keep RootCA.key and IntermediateCA.key securely. - Upload RootCA.crt and IntermediateCA.crt to client's system or browser. - Use IntermediateCA to sign server certificate needs (webserver, FTP server, mail server, etc) This configuration just example, configure the certificate name, attribute according to your needs. In this tutorial we use OpenSSL command but you can also use CA.pl script from OpenSSL. 1. Generate Root Certificate key. openssl genrsa -out RootCA.key 4096 2. Generate Root certificate. openssl req -new -x509 -days 1826 -key RootCA.key -out RootCA.crt Generate Intermediate CA Create a file subca.conf with the following contents: 1. Generate Intermediate CA certificate key openssl genrsa -out IntermediateCA.key 4096 2. Generate Intermediate CA CSR . openssl req -new -key IntermediateCA.key -out IntermediateCA.csr 3. Sign the Intermediate CA by the Root CA. openssl x509 -extfile subca.conf -extensions v3_subca -req -days...

How to make a root CA

Gambar
This is how to  make a self signed root CA With OpenSSL command With Windows CA via PowerShell This above command install a new Standalone Root CA with default settings. Read more:  https://docs.microsoft.com/en-us/powershell/module/adcsdeployment/install-adcscertificationauthority?view=win10-ps Import Root CA on Windows with Powershell

How to Install VPN software

Untuk di GNU/Linux misalnya pada Debian apt-get install openvpn https://community.openvpn.net/openvpn/wiki/HOWTO apt-get install strongswan xl2tpd https://wiki.strongswan.org/projects/strongswan/wiki Untuk di Cisco misalnya pada IOS, ASA Cek IOS apakah sudah mempunyai security license show version https://www.cisco.com/c/en/us/td/docs/security/vpn_modules/6342/vpn_cg.html https://www.cisco.com/c/en/us/td/docs/security/asa/asa96/configuration/vpn/asa-96-vpn-config.html Untuk di Microsoft misalnya pada Windows Server Core Install-WindowsFeature RemoteAccess Install-WindowsFeature RSAT-RemoteAccess-PowerShell Install-WindowsFeature Routing https://docs.microsoft.com/en-us/powershell/module/remoteaccess/ Paket-paket software diatas semuanya bisa digunakan untuk men-implementasikan konsep VPN PPTP, SSL, IKEV, dan L2TP/IPSEC.

Postgresql trust authentication on pg_hba.conf

When trust authentication is specified, PostgreSQL assumes that anyone who can connect to the server is authorized to access the database with whatever database user name they specify (even superuser names). Of course, restrictions made in the database and user columns still apply. This method should only be used when there is adequate operating-system-level protection on connections to the server. vi /var/lib/pgsql/data/pg_hba.conf # "local" is for Unix domain socket connections only local   all             all                                     trust login psql -U postgres

How to backup and restore PostgreSQL databases with crontab

OS: Centos7 Database server: PostgreSQL 9 Install database server, membuat user dan databasenya https://nciptandani.blogspot.com/2019/01/rangkuman-install-database-postgresql.html Berikut adalah script untuk melakukan backup pg_dump -U db_user -h ip_address -F t db_name > /path/to/your/file/dump_name.tar -U = untuk user apa yang akan konek ke database -F = untuk format file p – plain-text SQL script c – custom-format archive d – directory-format archive t – tar-format archive Sekedar contoh database dibackup misalnya setiap menit: pg_dump -U dev10 -h 10.148.0.6 -F -t  dev10db > /backup/dev10db.$(date +%Y-%b-%d-%H-%).tar Hasil nama file backup dev10db.2019-Sep-03-15-10-03.sql (file pada tanggal 3 september 2019 pada jam 15 menit 10 dan detik ke 3 Simpan password postgresql server di file vi ~/.pgpass *:5432:*:username:password chmod 0600 ~/.pgpass Kemudian akan membuat crontab nya masuk ke crontab file vi /etc/crontab kemudian ...

Basic How to Operate Docker

Seperti yang kita tahu bahwa container lebih ringan daripada virtual machine karena container menggunakan shared kernel dari host, namun untuk operasional sama seperti virtual machine yang bisa di create, start, stop, run, dll. Berikut adalah perintah-perintah dasar container menggunakan docker : Example: Download centos image Image ini yang akan digunakan sebagai blueprint dari container docker pull centos Melihat image yang sudah di download docker images Membuat/menjalankan container docker run -t -d --hostname=centos7-srv1 --name centos7-srv1 centos Masuk ke terminal container docker exec -it centos7-srv1 bash Melihat proses container docker ps -a Start docker docker start container_name Stop container docker stop container_name Delete container docker rm container_name Help man docker

how to run script at boot using systemd

Example I have script to run at boot Create your own script, my example is start-myscript.sh Make that the script executable with: chmod u+x /usr/local/bin/start-myscript.sh And then create a file named end with .service, this file will be used to call the start-myscript.sh, example: myscript.service file should look like this: [Unit] Description=My Script [Service] ExecStart=/usr/local/bin/start-myscript.sh [Install] WantedBy=multi-user.target Now do a few more steps to enable and use the .service file: Place it in /lib/systemd/system folder with say a name of myscript.service Start it: sudo systemctl start myscript Enable it to run at boot: sudo systemctl enable myscript Stop it: sudo systemctl stop myscript

How to create postgresql user and database with peer authentication

Default peer authentication is configured on pg_hba.conf I tried on postgresql version 9 RootTerminal#adduser dev11 RootTerminal#passwd dev11 Login with default postgres user first RootTerminal#su - postgres Login to postgres terminal with the following command -bash-4.2$psql postgres=#create user dev11 with password '$3curE'; CREATE ROLE postgres=#create database dev11db; CREATE DATABASE postgres=#grant all privileges on database dev11db to dev11; GRANT Back to RootTerminal and try login with user dev11 to access its database. RootTerminal#su - dev11 [dev11@centos7-vm1 ~]$ psql -U dev11 -d dev11db psql (9.2.24) Type "help" for help. dev11db=>

How to Configure PostgreSQL to allow remote connection

Example: db-srv-10 with ip 192.168.1.1 user database: default postgres Configure: find / -name "postgresql.conf" /var/lib/pgsql/data/postgresql.conf vi /var/lib/pgsql/data/postgresql.conf listen_addresses = 'localhost' with listen_addresses = '*' find / -name "pg_hba.conf" vi /var/lib/pgsql/data/pg_hba.conf host    all             all              192.168.1.024                       md5 Test:   psql -h 192.168.1.10 -U postgres

How to convert VMDK to OVA

Gambar
Disini saya membuat VM dengan VMWARE Workstation 15 dengan output file VMX,VMDK dan file-file lainnya kemudian akan saya buat menjadi OVA berikut caranya: Download OVF Tool dari VMWARE  https://code.vmware.com/web/tool/4.3.0/ovf Jalankan perintah ovtool  lokasi vmname.vmx  vmname.ova Berikut contohnya:

Konfigurasi Remote VPN L2TP/IPSec di Cisco Router IOS

Pada kesempatan kali ini akan mencoba melakukan Konfigurasi Remote VPN L2TP/IPSec di Cisco Router IOS, L2TP/IPsec merupakan salah satu teknologi VPN selain PPTP, IKEV dan SSL VPN. L2TP tidak mempunyai enkripsi oleh karena itu perlu di amakan dengan IPSec. L2TP/IPsec bisa juga di konfigurasi di Linux menggunakan paket software Strongswan, di Windows Server bisa menggunakan fitur RRAS. Ringkasan konfigurasi, show run Building configuration... Current configuration : 2192 bytes ! version 12.4 service timestamps debug datetime msec service timestamps log datetime msec no service password-encryption ! hostname EDGE ! boot-start-marker boot-end-marker ! ! no aaa new-model memory-size iomem 5 no ip icmp rate-limit unreachable ip cef ! ! ! ! no ip domain lookup ip auth-proxy max-nodata-conns 3 ip admission max-nodata-conns 3 vpdn enable ! vpdn-group l2tp-group ! Default L2TP VPDN group  accept-dialin   protocol l2tp   virtual-template 1 ...

Basic IPTables rules for SSH and Webserver

set the default policy to DROP #iptables -P INPUT DROP #iptables -P OUTPUT ACCEPT #iptables -P FORWARD DROP  accept anything on localhost #iptables -A INPUT -i lo -j ACCEPT #iptables -A OUTPUT -o lo -j ACCEPT  allow traffic once a connection has been made #iptables -A INPUT -m state --state RELATED,ESTABLISHED -j ACCEPT  accept anything on ssh port #iptables -A INPUT -p tcp --dport 22 -j ACCEPT  accept anything on http and https port #iptables -A INPUT -p tcp --dport 80 -j ACCEPT #iptables -A INPUT -p tcp --dport 443 -j ACCEPT  to save #apt-get install iptables-persistent

Configure Reverse Proxy With Apache2 on Debian 9

Load modules #a2enmod proxy #a2enmod proxy_http Virtualhost Configuration #cd /etc/apache2/sites-available/ #vi myproxyweb <VirtualHost *:80>         ServerName mywebsite.id         ProxyPass       /       http://192.168.1.1:8080/         ProxyPassReverse   /    http://192.168.1.1:8080/ </VirtualHost> Disable Default #a2dissite default Enable new Virtualhost #a2ensite myproxyweb Restart Apache #systemctl restart apache2 OK!

Cara menguplod file ke github

Buat account github Buat repository Gunakan alamat repository yang akan dipakai, contoh:  git remote add origin https://github.com/username/new_repo Ke direktori file file yang akan di uplod Misalnya cd /home/myproject git init git add nama_file atau nama_direktori atau . (tanda titik untuk semua file) git commit -m "My first project"  (pesan untuk catatan) git push origin master Cek git status

Cara konfigurasi Web Server IIS di Windows Server Core dengan PowerShell

Gambar
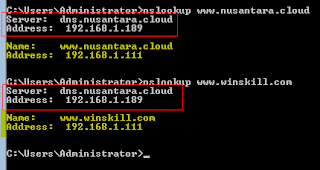
Di Linux biasa menggunakan Bash Shell kini di Windows akan mencoba untuk menggunakan PowerShell, pada post ini akan melakukan konfigurasi Web Server IIS, secara konsep sama kalau biasanya yang mulai belajar dari Linux menggunakan Apache dengan menginstall paket apache2, mengupload/mengedit file di /var/www, mengaktifkan modul, mencopy/mengedit file virtualhost di /etc/apache2/sites-available, sekarang akan mencoba melakukan hal-hal tersebut dengan menggunakan Windows Server Core, semua konfigurasi akan dilakukan dengan mode CLI melalui PowerShell. Oh ya sebelumnya pastikan Windows Server Core sudah mempunyai Hostname, IP, DNS bisa dikonfigurasi dengan perintah sconfig kemudian ikuti menu yang ada. Di DNS Server (bisa pakai Windows DNS Server/Linux Bind9/software lainnya) buat record untuk www.nusantara.cloud dan www.winskill.com  ke IP Windows Server Core. Disini DNS Server dengan IP: 192.168.1.189 Web Server dengan IP: 192.168.1.111 akan melayani 2 web yait...

Dasar konfigurasi NFS Server di Debian

fileserver IP = 192.168.1.1 Konfigurasi di fileserver fileserver#apt-get install nfs-kernel-server fileserver#mkdir -p /data/marketing fileserver#nano /etc/exports edit/tambahkan /data/marketing 192.168.1.0/24(rw,no_root_squash) fileserver#/etc/init.d/nfs-kernel-server restart client1#apt-get install nfs-common client1#mkdir /mnt/marketing client1#mount -t nfs 192.168.1.1:/data/marketing /mnt/marketing Kini NFS server sudah dimount di lokal /mnt/marketing, file yang tersimpan di /mnt/marketing folder akan tersimpan di server juga.  Untuk NFS options lainnya bisa dilihat disini  https://www.server-world.info/en/note?os=Debian_9&p=nfs&f=1 Agar saat reboot mount tidak hilang bisa disimpan di file /etc/fstab seperti berikut edit/tambahkan 192.168.1.1:/data/marketing  /mnt/marketing  nfs  defaults  0   0

How to configure freeradius with local users

Gambar
OS: Debian9 Package: Freeradius 3.0 Hostname: srv1 This is step by step how to configure freeradius with local users (/etc/passwd) In this scenario, I want to create 100 users with a password and no shell login to the system capability that can be done with the following commands: for i in `seq 1 1 100` do useradd user$i echo -e "P@ssw0rd\nP@ssw0rd" | passwd user$i done common-auth-radius  is for radius users Edit like below: And then configure no login with PAM pam_list_file in the /etc/pam.d/common-auth to limit login to the system Only users in the /etc/loginusers can login to the system Create a file loginusers in the /etc/ Because FreeRADIUS 3 no longer accepts "Auth-Type := System". It's by default use unix pasword so we want to just configure for client use like belo w: /etc/init.d/freeradius restart Testing in srv2, we need to install freeradius-utils for testing purpose, use radtest ...